Our Accessible Garden Beds Construction

The Beginning!
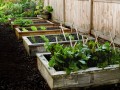
Well, after a number of delays, including some due to weather, our co-op is finally going to get its fully accessible raised bed gardens! You can read about the planning stages in my Accessible Garden Beds lens.
Today (May 30, 2012), I spoke directly with the carpenter that will be building the beds and took a few photos of what it looks like now. Over the next while, as the construction proceeds, I will add more photos. First up, here are the before pictures, along with the details the committee worked out in regards to dimensions. I hope you enjoy these, and that the information here will be of help to anyone thinking of building accessible garden beds in the future.
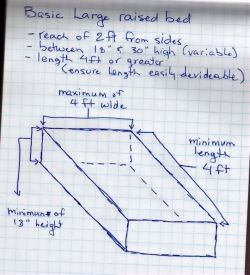
(note: the image here is a scan of one of the general sketches I made, based on information I gleaned online. Visit my Accessible Garden Bed lens for more information, and links to the various sites I found useful.)
Location A

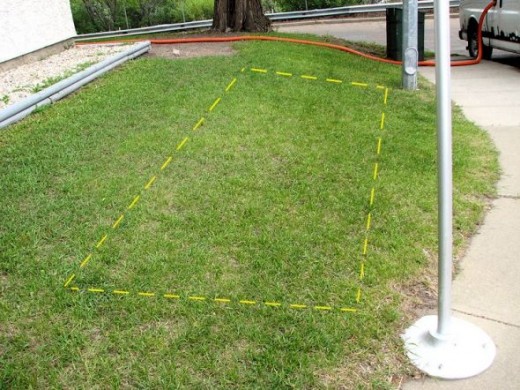
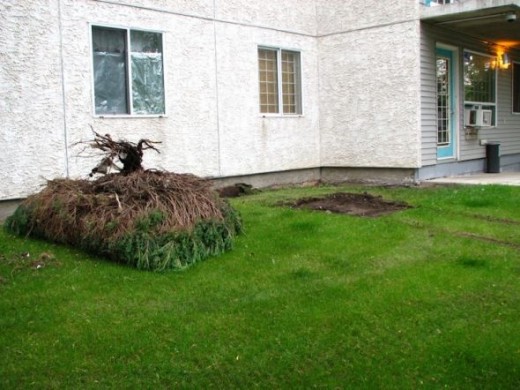
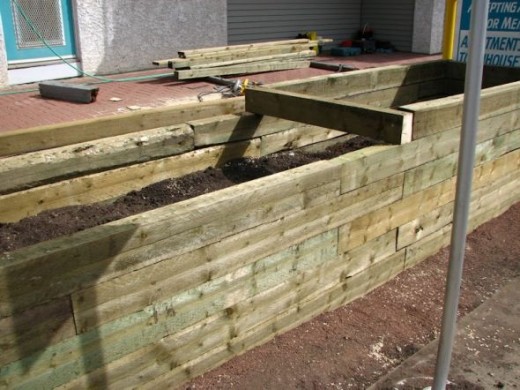
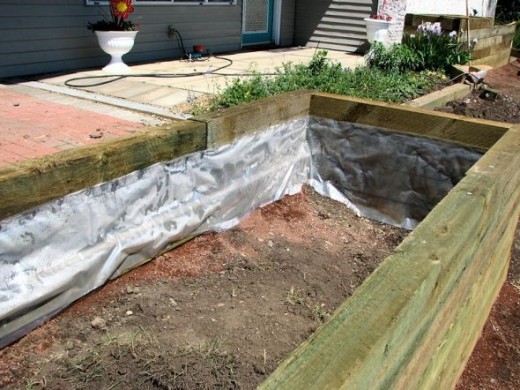
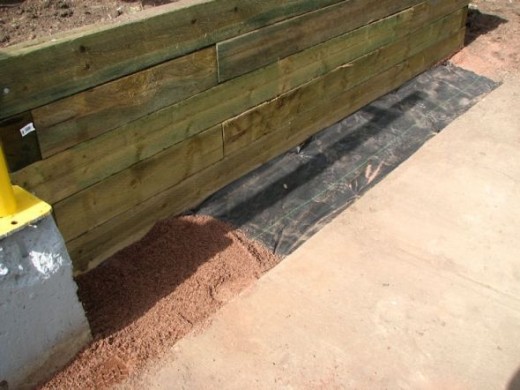
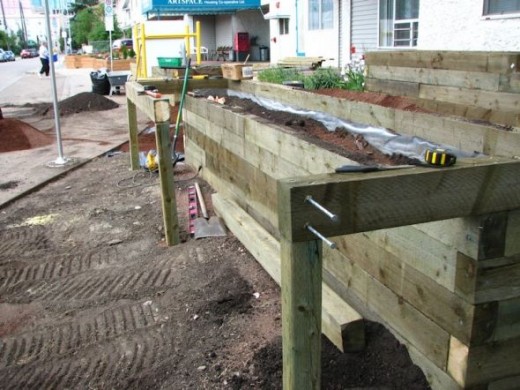
This bed will be right along the main entrance to the high-rise of our co-op, directly opposite the beds that were built last year. From the edge of the entry to the concrete structure is 16 feet, and that will be the total length of the bed. The width will be 4 feet, which is slightly narrower then the actual width of the grassed in area. The sidewalk also curves outward, so it's wider on the right side in this photo then on the left. The gap between the side of the bed and the sidewalk will be filled with packed down crushed shale, like the path that will be built in another location. The beds will be built using 4x6 pressure treated wood. The existing beds are built with 6x6 pressure treated wood, but it has been found that the width was a bit of a problem in regards to reach. This change is a bit of a compromise, giving gardeners an extra 2 inches of gardening space, bringing it a bit closer, while still being wide enough to counter concerns about the sides bowing out from the weight of the soil.
The West half of this bed will be 30 inches high, which will also be consistent with the existing bed on the other side. The East half of this bed was originally going to be 36 inches, but it may end up being 42 inches high. One of our members has already reserved this spot for her gardening, and has back-related mobility issues. When the actual construction starts, she will talk to the carpenter directly to ensure that the height is where it needs to be for her to garden without causing extreme pain.
The actual construction of this bed, plus the area pictured below, will have to wait until the patio edge gets fixed. As you can see somewhat in this photo, and more of in the photo below, the patio edge is starting to collapse. The patio is 20 years old and, with the slope, it was bound to become an issue eventually. Buiding these beds means that the edges will not only be fixed, but they will not collapse again. Though it is an easy fix, the bricks will have to be removed slightly beyond where it starts to collapse downwards, so it's a fairly big job. There's the 16 feet of edge on this side, another 10 feet or so on the other side, plus about 2 feet deep.
The juniper will have to be removed, which the carpenter did not know about. I believe that will be a job for the landscaper, who is also the one that will be repairing the patio edge. If things go well, he may even be able to start that today, but I am not expecting it to happen until tomorrow.
The Juniper
The juniper bush in the above picture has been the focus of more contention then I ever expected. People either love it or hate it! It's been here for 20 years, but will have to be removed to make room for the raised bed.
What do you think of the juniper and its removal?
Location B

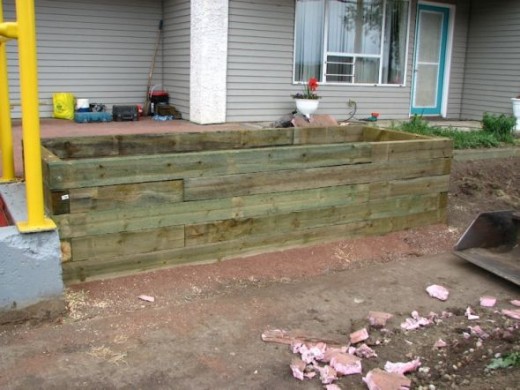
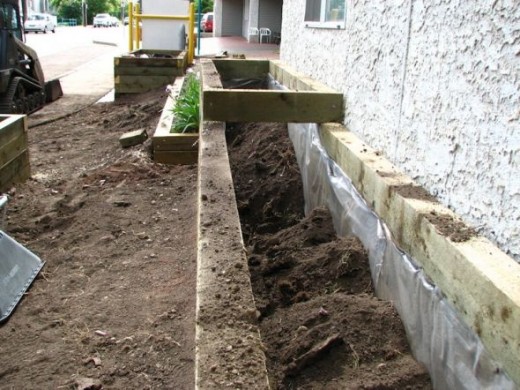
This spot is going to have the easiest and most basic of the beds. A simple rectangular box that matches the length of the patio (just over 10 feet), 4 feet wide and 30 inches high. As with Location A, the grassed area is slightly wider then 4 feet, and the gap between sidewalk and bed will be filled with crushed shale.
As you can see, the patio edge is collapsing more on this side then along Location A. You can also see where the pressure treated wood is showing some rot. All that needs to be fixed before the bed can be built.
Beginning the Path
The lines I've marked in this photo are just generally showing where a path of packed crushed shale will begin. The edge on the left is where the bed in Location B will end, and the crushed shale will extend in front of it.
In the process of building the path, the front of this existing flower bed will be stabilized, so that it will no longer be eroding down the slope.
The path needs to be a minimum of 4 feet in width, to allow someone in a wheelchair to not only travel the path, but be able to turn in it. Modern motorized wheelchairs can turn on a dime, but for someone in a manual chair or an older motorized chair, it can take a bit more space. The websites I'd visiting stressed that minimum of 4 feet, so when we met to hash out the details, we took a measuring tape to one of our members in a manual wheelchair to be sure that we didn't have to increase that minimum. After discussion, we decided we could leave it at 4 feet.
Location C
The yellow lines in this photo mark approximately where the bed in this location will be built. This one is going to be a bit of a challenge!
The bed itself will be a simple rectangle measuring 16 feet long and 4 feet wide. The sidewalk side, however, will have a table planter, and that's where things get challanging.
A table planter has knee space below it to allow someone in a wheelchair to go right under. After measuring our member that wants to use this space, we found that the knee space needed to be 28 inches. The research I'd done had suggested a minimum of 27 inches, but that turned out to be exactly how high he was in his chair, so that extra inch is needed for clearance.
The carpenter brought up a few concerns about this section, and I was glad to hear him do so. He brought up drainage, weight, planting depth, thickness of materials, and concerns about rot. The base of this section cannot just be the 4x6 inch pressure treated wood the rest of it is being built with. That would rot away in a couple of years. We talked about things like a liner, an angled slope to allow it to drain into the other side, and the use of other materials. He is going to consult with the landscaper for ideas as well. We also talked about support for all that weight. I left the discussion with a lot of confidence in the carpenter, his attention to detail, and future focus.
The height of this planter is going to depend on how thick the bottom of that table planter area will be. It will be 38 inches - 28 inches for clearance under the planter, plus 10 inches of planting depth - plus the width of the base, so it may be greater then 42 inches on the sidewalk side in total. The height of the other side of the planter can match whatever the table planter side needs to be at the top; since the ground slopes on that side, it may be several inches shorter then the sidewalk side. We shall see how that works out. Crushed shale will replace the sod under the table planter side to make it wheel friendly.
Location D

This last bed will replace most of what is now a rock bed, which I believe was built because it was a problem area, similar to what I can see around the corner of the building, where backfill is now needed. Another job for another time.
The planter bed here will be 16 feet long, beginning from the West edge, next to the existing flower bed, and will have a reach of 2 feet. The rock bed is actually longer then 16 feet, but there is some infrastructure half-buried at the corner that would be in the way of building the needed path, so we decided against having it run the entire length.
The back of the bed will have a wall of 4x6 inch pressure treated wood, but that width does not need to be included in the reach, so the total width of the bed will likely be 2 ft 4 inches. This is narrower then the existing rock bed. As this bed and the table planter bed in Location C are both to be 16 feet long, they will be lined up with a path of crushed shale at least 4 feet wide in between.
Like the bed in Location A, this bed will have two heights. Half the bed will be 36 inches high, the other half will be 30 inches high, to accommodate different mobility requirements.

So what's next?
Now that we've got it all planned out and construction set to begin, we were finally able to get the word out to all our members, along with detailed descriptions of the different sections. Those who are interested in planting have been asked to submit their names for preferred locations. At the time of this writing, there are at least 4 people interested. Once the beds are built, we can look at how many names there are and, if necessary, divide the beds into assigned plots.
I've talked to some of our interested members already, and they are very excited about these beds! It's a bit late in the year for some types of planting, especially for planting from seed, but that's okay. Transplants are still available, so that opens things up.
Each member will be responsible for their own section, and can plant pretty much whatever they wish. There will be some limitations to take into account, such as the high winds we sometimes get screaming through this area, but that's part of the learning process.
I will continue to post photos here, as constructions progresses. I look forward to being able to share photos of what our members have decided to plant in our new, fully accessible gardens!
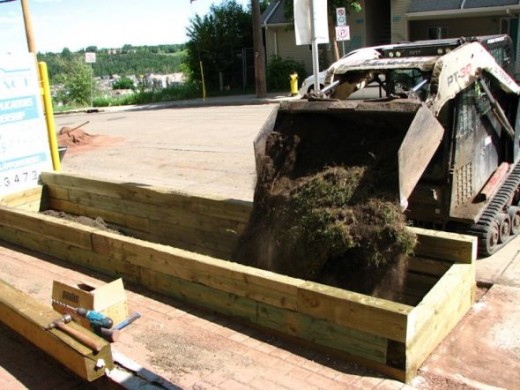
June 5, 2012 - Work begins!
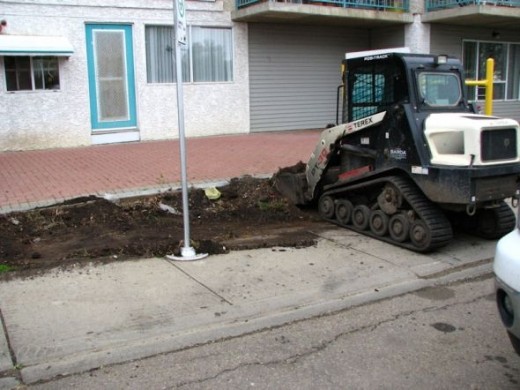
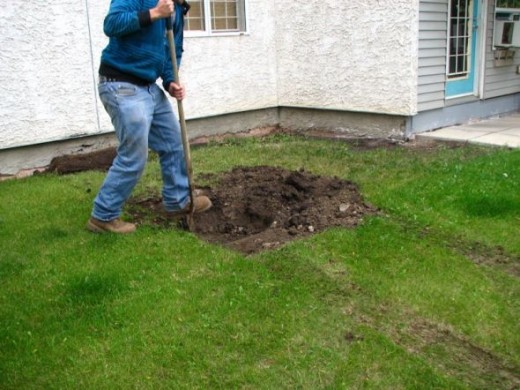
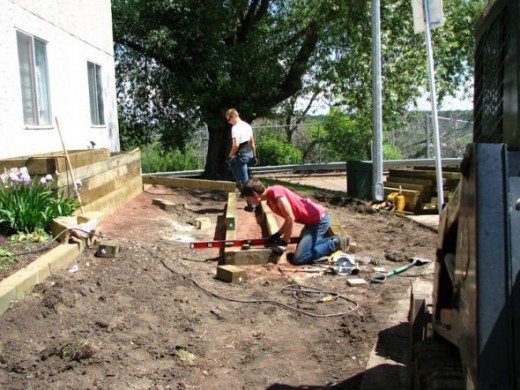
After delays due to weather and it just plain being the busy season, a worker arrived this afternoon to ready the areas.
Here you can see him working on Location A. The juniper was removed, and he's taking out the sod and soil to level it out. He could not remove the wooden beam bordering the patio, as it's framed by concrete at one end, along the entryway. They'll have to find some way to remove it when they fix the patio edge.
There was a lot of garbage stuck under that juniper!
The Juniper
Some of our members are very attached to this juniper, so the worker was asked to move it to the side for transplanting. After checking to make sure there would be no issues in regards to the underground parking, he cleared off a bit of the sod. The rest would be done manually.
It should be noted that this was not at all part of the job, so it's an extra he was willing to do for us on request. A good time to note how good this company has been about some of our odder and unexpected requests!
Our Contracting Company
For those wondering who we hired to do this job, our committee chose All Star Landscaping Services Ltd. We have been very happy with them so far, and appreciate the care they've taken to make sure this job is done properly. I would not hesitate to recommend them.
Sod Removal
The sod and soil removed was dumped into a trailer to be hauled away completely.
For all the rain we've had lately, including some today, I was surprised by how dry the soil was!
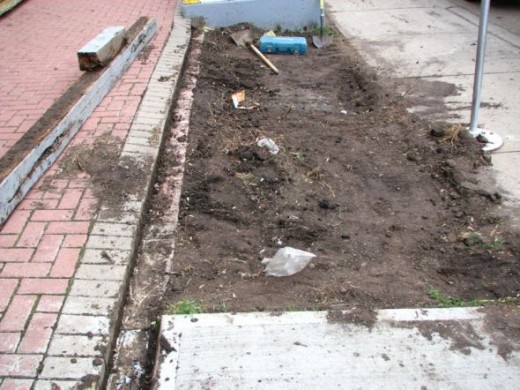
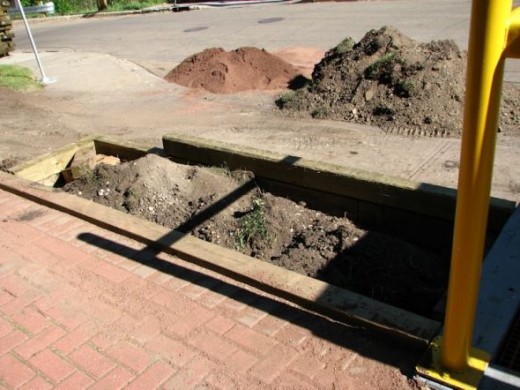
Moving on to Location B
Working on Location B.
After taking away some of the soil, the wooden beams bordering the patio were taken out and moved to the side. I don't know if they are salvagable, but the edge of the patio is ready for straightening.
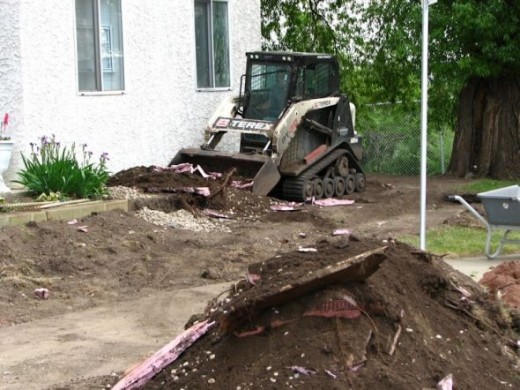
Disaster Strikes
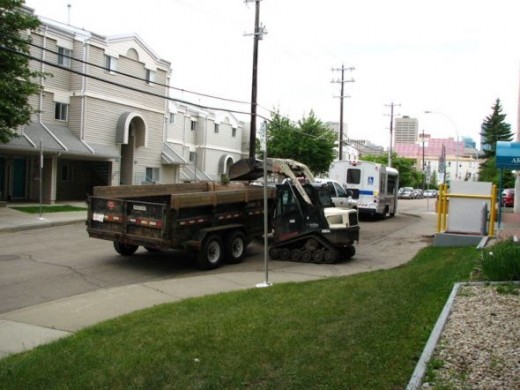
The worker had moved on to leveling the area in front of the existing flower bed, where the West end of the path will be built, when disaster struck. He heard an odd noise, then hydraulic fluid started gushing out.
He called the company and someone came out to help him check it out. There was nothing they could do. They couldn't even take it away. When it was started in an attempt to load it back onto the trailer, more fluid immediately started gushing out.
Work is done for the day. Tomorrow, when the carpenter comes out to build the boxes, they will have to come out with another machine to finish this job.
Transplanting
While waiting for someone to come out, the worker used the time to dig a hole and transplant the juniper.
Once the juniper was in place, getting the soil pushed back around the root was a bit of an issue! He did the best he could for now, but it's up to us to finish the job. It'll need to be backfilled a bit more, then watered thoroughly. We shall see if it survives.
That's as much as can be done for today! The company does have a second machine, but it was being used elsewhere today when it jumped its tracks! It was in the process of being repaired when this happened.
Even with this delay, our members are really exited that work as started. The member who's unit the flower bed belongs to told me she was so happy, she was ready to get up and dance. She's in a wheelchair, so that would have been something to see!
So many people are thrilled about these beds and looking forward to being able to garden again. At this point, I think we have six names submitted for the four beds. Once they're built, we'll have to go over the names and see how we can divide the beds into plots for each member that's interested.
Not even this newest delay has dampened the excitement!
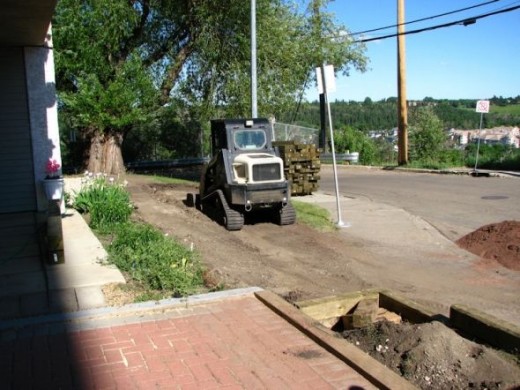
Days Two and Three - June 6 and 7, 2012
Day two of construction blew in miserably. For a while, I wasn't sure they'd be able to work at all. There were storm warnings all over, and even a tornado touched down in the South of our province, but we missed the worst of it. High winds and bursts of rain were all we had to deal with.
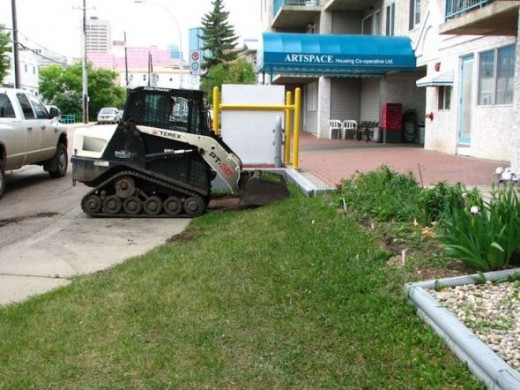
The bobcat was still out of commission, so they were limited as to where they could work. In this photo, the patio edge along Location A is ready and waiting while they went and picked up the crushed stone.
Patio repair

They ended up going with crushed limestone instead of crushed shale, as the colour better matched out patio. Here, some of it is being used under the support beam and patio edge. The original beam extended further, framed by the gap in the concrete edge.
Foul weather aside, they got the edge done. Another guy came out and worked on the bobcat until well into the evening. It turned out 3 out of 5 hoses had burst. Parts were not available, and he had to find someone who could make some of them from scratch!
Though a lot of work was done on the second day, it wasn't the sort of work that was quite as visible, so not too many photos out of it. For that, we go into the next day.
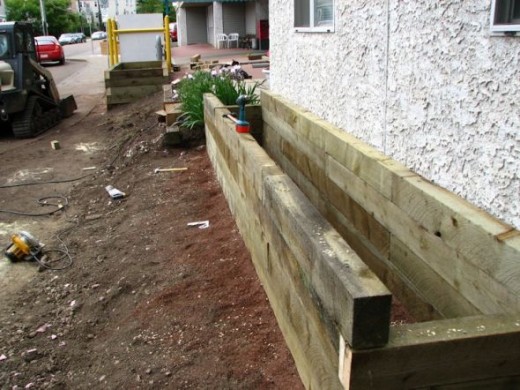
Building up Location A
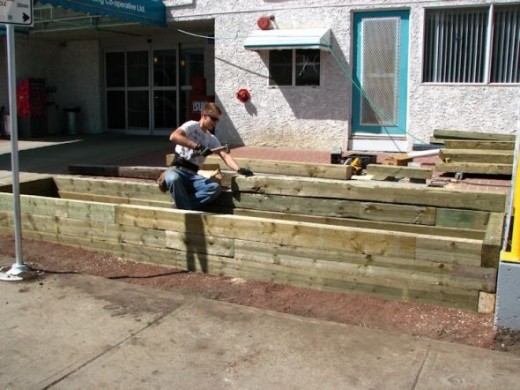
Once the patio was fixed and the foundation beams were properly leveled and placed, construction was visibly faster. This is the section that will be 30 inches on one half, 36 or 42 inches on the other. This is measured from the sidewalk side. The patio is a fair bit taller then the sidewalk side, so the wall heights will be shorter. Hopefully, that will not be a problem for those who find bending painful.
Building Location B
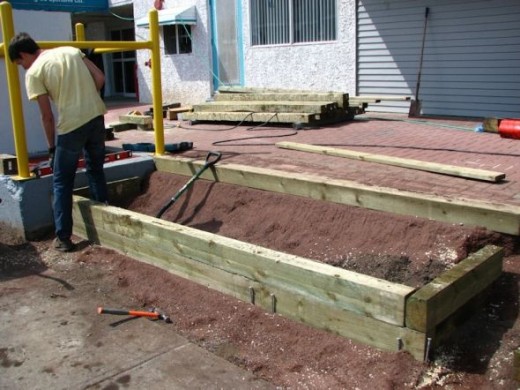
Once they were able to move the bobcat out of the way, it was a quick job to fix the edge of the patio and begin building the second planter box. Nothing fancy about this one at all, so it should be done soon.
Removing Sod and Leveling

After the walls on both boxes were built up a fair bit, one of the guys continued the job of removing the sod and preparing the areas for Location C and the path.
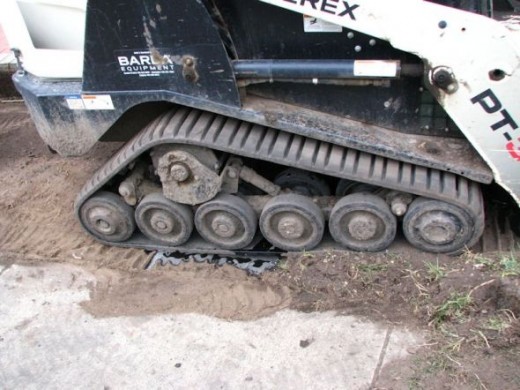
Yes, this is the same little beasty that lay broken and in pieces for two days. The poor guy fixing it had to remove the seat to get at one of the areas of repair; a difficult location to get to. The third hose he found was a relatively easy access from below. I got to chat with him for a bit and asked why three (out of five) hoses would go at once like that, and he could only guess that they were rubbing against each other. There's a lot of pressure going through those hoses. At least we can say for sure that they didn't catch on anything from below while the sod was being cleared.
Waste Not Want Not
With the boxes partly framed, the sod and soil could be placed in the bottom, rather then be taken away. Not all the sod cleared went into these boxes; they will be top filled with garden soil when they're done, but when the other two boxes are built, the rest of the soil cleared will be able to fit into the bottoms of them as well, I'm sure.
Location B Done for the Day
This is as far as they got with Location B for today. It's not going to be too much higher then this on the patio side for it to be 30 inches on the sidewalk side.
Waiting
The rest of the timber for the beds was delivered near the end of the day, and was unloaded onto the sidewalk. Because of how our road is, this section of sidewalk doesn't really get used. That will change once the table planter in Location C is built!
I'm looking forward to seeing how much more they'll get done tomorrow. We're expecting some rain, but I don't think it'll be enough to cause a problem. I can't complain about getting rain. We really need it.
Some of our members are really excited about these finally being built, even with things being so late for planting. One member I talked to already has her potatoes and a purple tomato plant, waiting to be transplanted! Others have told me about the flowers they want to plant, and another is eager to plant his herbs. We'll be getting a good variety in these planters, that's for sure!
Of course, not everyone is happy that these are being built, but co-ops are democratically run and the membership voted to build. Hopefully, in time, those against the project will learn to appreciate how much some of our members want them, and see what a great addition these will be to our tiny community.
Construction Day Four, June 8, 2012 - Flower Bed Border
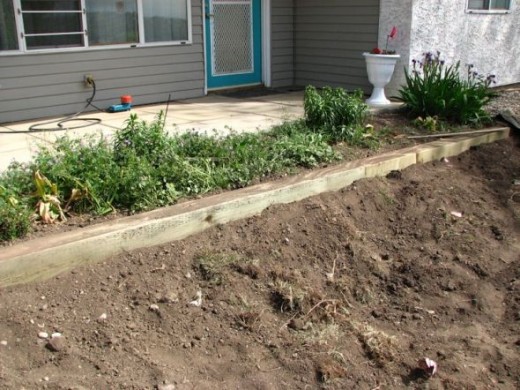
On friday morning, one of the first things that got done was placing the structural support beam for the existing flower bed. This is right in front of a member's private patio, and had been a bit of an eyesore for a while. Previously, there had been a plastic border, but with a relatively steep slope, it wasn't enough to keep the soil from washing down, taking the plastic border partly with it. Now, with an actual wall to border the bed, with a path soon to be built that will end the problem of erosion, plus a look in keeping with the 4 boxes being built, the whole thing is going to be a great improvement. We have a very happy member - though we are hoping the plants there now didn't take too much of a beating in the process!
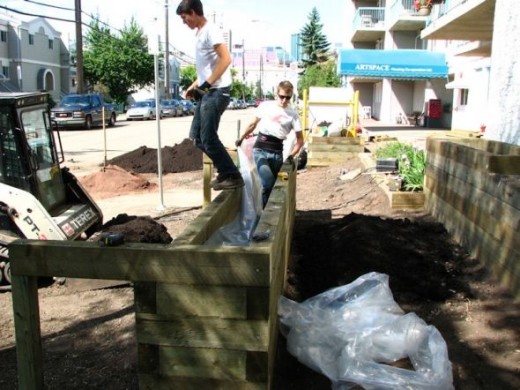
Location A - Complete! - Dual height box near entry
This was the box where we weren't quite sure how high it needed to be built; it was going to be either 36 inches or 42 inches on the taller side. When I came out to take these photos, the box was already at this stage; 36 inches. I quickly phoned the member who has that section reserved already, and she was able to come down.
Standing from the sidewalk side, the height was just right for her. Though the patio side is a fair bit shorter, she felt that it would not be necessary to increase the height any more.
Which meant the box was complete! After this, it's just taking care of the space between the bed and the sidewalk and adding garden soil.
Location B - Complete! - Second box along the patio
It wasn't much longer before the box in Location B was complete. This one is a basic rectangle, 36 inches at the sidewalk side. It was built to match the remaining length of the patio, so it's about 10 ft 4 inches long. It just needs the garden soil and crushed stone by the sidewalk.
And paint. I forgot about the paint. All the boxes will be painted to match the boxes that were built last year, which you can see in my Accessible Garden Beds lens.
Location D - preparation
The rock bed against the wall where Location D is to be built had to be cleared away.
First, as many of the stones that could be salvaged were removed for later. Then the whole thing was dug up.
Under the stones was some landscaping fabric, soil and foam insulation.
Location D - in progress
This box will also be a dual height. At the time of this writing, it is complete up to 30 inches, then they stopped for the weekend. The only thing they need to know is which side will be the higher one. I should talk to the member that wants this spot, and the member with the flower bed, and see what they think. Visually, it would make sense to have the taller side on the left, but we don't want to shade the flower bed any more then we have to, either. In the end, I really don't think it matters either way.
A lot of visible progress made on this day! We've got a break for the weekend, with a few torrential downpours that no one needed to work in, thankfully. On Monday, they'll be back to finish this box, then start working on the box with table planter in Location C and build the paths. If all goes well, they will be finished all of it by the end of the day!
Construction Day Five, June 11, 2012
It was pouring rain this morning, and for a while I thought we wouldn't get any building done at all. Thankfully, things cleared up and most of it was a hot and sunny day.
Some details were finished up early on. The insides of all the finished boxes were lined with plastic for added protection of the wood. In this photo, you can see the condensation from this morning's rain! The red visible at the base of the plastic is the crushed limestone that was used to level the patio stones and foundation beams of the planter box.
Location D and flower bed end complete
The final bit of height to finish Location D was added, with the decision to put it on the Western half of the box. The plastic was installed, then some of the sod and soil removed from the slope was added.
The end of the flower bed was finished with some wooden end pieces. The bottom piece will likely be half buried when the bath area is finished, but it makes it look a lot tidier, and there won't be any dirt washing away.
Finished end of Location D
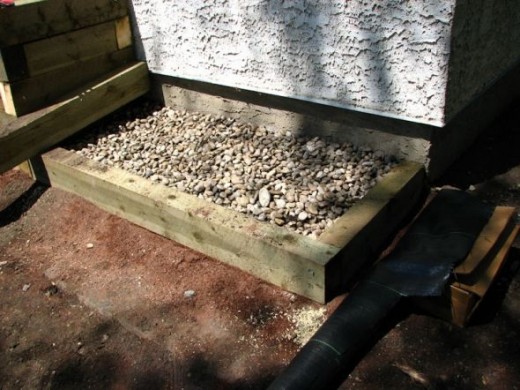
A small box was built to finish off the last few feet against the wall and filled with what rocks could be salvaged from the original rock bed that was there.
In this photo, you can see part of a metal plate of some kind. The rock bed had covered it completely. The builders had thought they could remove more soil so that this bed would not be so much higher then Location C until this was discovered. We don't know what it is, but it's likely to be part of the underground parking. When the paths are finished, this will be covered again, though not too much. There's a manhole cover just a few inches away from the corner that needs to stay uncovered, so things have to stay shallow.
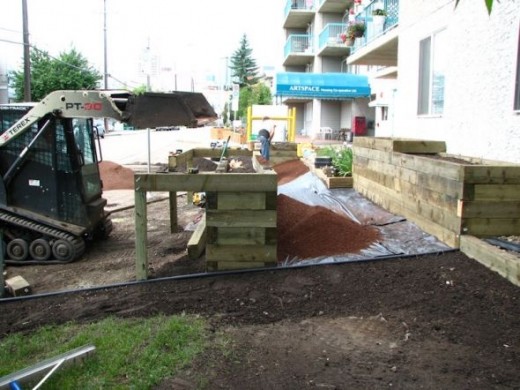
Location C Started
This bed is going to require a lot more thought and work then I think anyone expected. The slope causes all sorts of problems. The ground at the table planter side has to be level with the sidewalk, so more sod and soil had to be removed. The full box side, at only 2 feet wide for most of it, was lined up with the box in Location C. As the path needs to be a minimum of 4 ft wide, they measured that distance from the edge of the flower bed, where it sticks out farther then the planter box. This way, the path will have an "entrance" that's 4 ft wide, but the rest of the path will be several inches wider. There should be plenty of space for someone in a chair to turn around, or for two people to be working at the same time.
The space between the two boxes will be built up again so that the path will be level. That means the bottom of the box in Location C will be partly buried and not as high as the table planter side; a good thing, since the table planter side will be the highest of all.
The Eastern end of this planter is a bit of a problem. Because of the infrastructure, there's not going to be a full path around the end. That's not going to be an issue, since the box has access from both sides, so there will be no area that cannot be reached. With the soil getting built up on the one side, after being leveled lower on the other, any path on that end is likely to have a steeper slope than before everything was dug up and leveled. One possibility was not to have a path at the end at all; just put soil back and seed it. With the willow tree, though, nothing grows there anyhow. Not having to make a 4 ft wide, wheel friendly path for the end makes it a bit more flexible for them to find a workable solution.
Filling in the Spaces
Before finishing for the day, the spaces between the sidewalk and the boxes in Locations A and B were lined with landscaping cloth and topped with the crushed limestone.
It's looking like we might have a bit of an issue with Location A. There's two people who want it! The taller side was reserved by one of them long ago, since it was built specifically to the height she needed, but the other is convinced she's already been assigned the entire 16 feet, not just the lower half, despite being told repeatedly that the taller half was build specifically for someone else. We have a total of 7 names on the list now, so no one is going to get an entire planter box to themselves, and we're going to have to figure out how to share the space. My own name is on the list, but as I don't have mobility issues as severe as others on the list, I plan to take my name off. That will make splitting them up at least a little bit easier.
Which is rather funny, considering one of the objections to having this built was the belief by some that no one, or just one person, would be using them. They're not even done yet, and we've not only got more people then boxes, but they're in contention over who gets which location!
I'm hoping they will be able to finish the construction tomorrow, but looking at the weather forecast, we have severe thunderstorms predicted for the next two afternoons, and more rain for the next two days after that. Hopefully, the stormy weather will hold off until after they finish building!
Last Day of Construction! - June 12, 2012
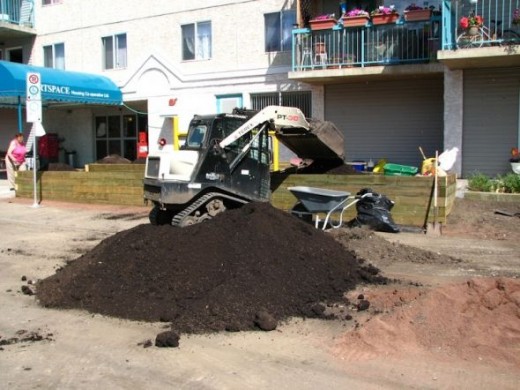
More crushed limestone was delivered, along with a load of garden soil. Locations A and B were topped off with garden soil first. One of our members was so eager, she was soon out there with her little gardening tool, leveling out the soil in the section she's signed up for!
So one of the guys stopped to rake it out for her.
In this box, there is one beam that is going to be replaced later on. Instead of being squared off on all edges, one was rounded off. Since it's more of a splinter hazard, they were asked to replace it. They'll do that later, when they come back for another job our co-op has hired them for.
Yes, we are VERY happy with these two!
Working on Locations C and D
The regular side of the table planter box is being lined with plastic. This both protects the wood and prevents the chemicals used to pressure treat the wood from leaching into the soil.
With the table planter half not done yet, there was room enough for the bobcat to bring a load above the box to dump closer to the box.
Working on the Paths
Rather then building a path around the East side, they just added an edging at the end of the path, returned and leveled off the soil side, and started adding the crushed limestone.
The crushed limestone was added along the sloped edges by the flower bed and the end of Location B as well.
Finishing the Table Planter
Then it was back to working on the table planter side of Location C.
The based was built using 2x6 boards, placed at an angle. The board that's dividing the two halves has a space under it to allow for drainage into the regular box side. The table planter's bottom was lined with a plastic to protect the wood from moisture.
Then it was time to prep the soil under it before it could be covered with the crushed limestone.
The Finished Boxes!
Click thumbnail to view full-size


Or... not quite done!

One of my neighbours and I came to take a look at the boxes later in the evening. She was in her power chair, so she was the first person to test out the wheel friendliness of the paths.
As you can see, it didn't quite work.
She was only able to go so far when the wheels sank and started to spin. She was able to back out, but not go any farther forward.
She tested out the path to get in between boxes C and D, but sank there, too.
I took photos and emailed them to All Star. In the morning, I had a response. They would come back with a tamping machine and go over it again.
As I was working on uploading these photos to my flickr account, one of the guys did come out and test out the tamping machine, but it would depend on the weather. We've had some rain since them (I'm writing this on the 14th), but the crushed stone was too dry. He hosed some of it down and used the tamping machine along the boxes at A and B, but it was late in the day and he did not have time to finish the job. The weather has set them behind on another job, but they'll be back.
Meanwhile, those who have put their names on the list for planting space need to get together, though two spaces are already confirmed and one is already planted. The co-op has a garden plot agreement for our other spaces, where people who apply for a garden plot agree to be responsible for the care and maintenance of their own plot, and no one else touches the space assigned to them. We need to have something similar, though the very nature of these spaces means that some people will need a bit of extra help along the way.
Though the paths still need to be tamped down more, one section of wood needs to be replaced and, after a few weeks to allow the wood to dry out, they will be painted to match the boxes that were built last year, the job is essentially done and the boxes are ready for planting.
We'll also have to make sure to keep the transplanted shrub well watered, as well as the areas they seeded with grass.
I will continue to add photos as these get done. Meanwhile, feel free to visit my flickr account where there are more photos then what I've included here.
Gardening Delights - Photos of what some of our members grew in their new plots, taken August 2012.
Click thumbnail to view full-size